Y'all, TRUST that this GORG dining room didn't just wake up like this...
Read MoreGuess Who's Coming to Dinner?
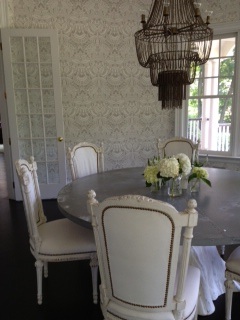
Y'all, TRUST that this GORG dining room didn't just wake up like this...
Read MoreIt's time to get down and DIY dirty, y'all, with some hot bulletin board action...here's what we're making, in case y'all are too lazy to click to the last post:
Here's what y'all need to do:
-measure out your inset panel, height and width, or whatever area you want to create a bulletin board in...and then measure it again...of note: this area should be at least 1/2" deep, if you plan on insetting a bulletin board into it and then framing it out...this will make more sense later, keep reading...
-get yourself to a home center or building supply store to purchase the following:
* homosote (hee, hee...I typed HOMO y'all!) This is the material that will become your bulletin board. It's normally used for soundproofing and it comes in 4' x 8' sheets (1/2" thick) for around $25-$30 per sheet. Homosote is a great material for bulletin boards b/c it's cheap, extremely durable and can be painted or upholstered to suit your style. Check this guerilla footage of me cutting my homosote right in the Home Depot PJcuttinghomosote, shot by the uber-talented genius, Chris White Here's what I ended up with:
 *molding/trim- y'all can get as fancy here as you like, I chose a more classic, simplistic profile to stay in line with the existing architecture of my apt so the look is more seamless when completed:
  Trimming your bulletin board out isn't necessary, but it will give you a much more polished look. You're basically making a picture frame for your bulletin board, like this:

This requires cutting the trim using a miter saw. If you aren't comfy doing this, see if you can bat your eyelashes or push up your 'girls' or 'boys-- whatever you're rockin'-- and persuade an associate at home center to cut trim for you in the dimensions you need. You can also purchase a miter box and handsaw kit that's really easy to use and less drama than a power tool.
*construction adhesive
*finishing nails,countersink & wood putty
*hammer
*level
*paint and/or fabric & batting, staple gun
Once you've gotten your goodies, it's time to get your construction on.
*Apply small dime-sized blobs of adhesive to the inset area on door. Next place your piece of homosote carefully into the panel and hold firmly for a good 20 to 30 seconds. Kind of run your hands all over that shiot to make sure the adhesive blobs spread out and begin to work their sticky magic.
*Next, line up your pre-cute molding/trim to one side edge, the trim should slightly cover part of the cut edge of bulletin board AND the door. Be sure the length of molding matches up to the length of the seam you'll be covering...test that the top piece of molding fits at a perfect 90-degrees when held in place to the side edge molding piece.

 If y'all have a doorknob that you want to cut around, carefully remove the doorknob. Holding your piece of molding in place on the front side, carefully trace the curvature from the backside-- through the existing doorknob hole-- make sense? Cut away curvature from the trim. Now, nail your finishing nails every 12" or so, through the molding into the door. Countersink them. Fill with putty, let dry and sand. Fast tip: y'all can use a drywall spackle in place of wood putty for filling the nailholes-- it dries faster, and it's paintable! Here's what I've got:
 If y'all don't want to paint your bulletin board, you can upholster it...you'd do this BEFORE you install your trim. Wrap your board with batting, then your fabric of choice and staple. Super easy.
Now this is what I call a BULLETIN BOARD!!! (Note: I use t-pins in place of more traditional push pins b/c I like how they look and since they're so long/strong, I can pin up a lot of shiot without them popping back out at me!)
I love how it turned out and the fact that I have this much more space for my pinning pleasure is incredible! Remember, I also did the same project on the backside of my closet door, here's what that looks like:
If y'all don't want to paint your bulletin board, you can upholster it...you'd do this BEFORE you install your trim. Wrap your board with batting, then your fabric of choice and staple. Super easy.
Now this is what I call a BULLETIN BOARD!!! (Note: I use t-pins in place of more traditional push pins b/c I like how they look and since they're so long/strong, I can pin up a lot of shiot without them popping back out at me!)
I love how it turned out and the fact that I have this much more space for my pinning pleasure is incredible! Remember, I also did the same project on the backside of my closet door, here's what that looks like:
 I'm not gonna lie to y'all, this project will take a minute, but it's totally worth it! Remember to always measure twice and cut once! Now go get your bulletin board on!!!
You’ve most likely heard the edict, ‘Make your walls work for you’ and if you haven’t, well, then…make your walls work for you. But I’m going to get all kinds of cra cra on yo asses and declare, ‘Make your doors work for you!’ Uh huh! Scandal!
Y’all didn’t realize your doors could do more for you than just open and close? Oh Dahling…have I got a post for you…
With my ever-expanding style empire, ahem ahem, I found myself in need of a large bulletin board. Y’all know, to pin up all that style and what not. But since my apt walls are almost filled to capacity, I was going to have to get creative and carve out another spot for my pinning pleasure. Hello closet door! Just behind my desk in my office area, is my prop closet with a door that has a inset panel just begging to be used!  At 1 ft wide and over 5 ft high, somebody just got themselves a big ole bulletin board. Actually, TWO b/c the back of the door has the same inset! Now, that’s what I call a double style backslap! But before any slapping can begin, I've got work to do...and so will y'all when you decide to take yourselves there and make this tangy treat for your space...check back tomorrow to get all the dirty DIY details...yummy!
En route to a beach housewarming party, Dyl and I put on our big girl panties to brave Target Atlantic Center on a Saturday. Which for those of y'all who've experienced this firsthand, you know I speak the truth...this isn't just some 'Dynasty' tv show drama...this is full on Tar-ghetto at its finest, y'all! Well, well, imagine my joy upon seeing this graphic greet us at the door:

Awww, that's a puppy after my own value-driven heart...y'all know biotch loves a bargain! And lo and behold, we found these wicker wrapped glasses on clearance that were just too cute to pass up, ruff ruff!

Have y'all ever beheld so much joy? That's not a glare from the glasses, oh no...that's bargain shining through!! HOT! And at $4.18 a pop, our new homeowner will have the happiest AND warmest home on the block! Cheers!
Y'all, the good folks at Ikea must just be beyond exhausted, what with all the style sass they're constantly serving us...just yesterday I was in the Brooklyn store and was style slapped by this new runner:

I'm just j'adoring the fun, poppy stripes of this beauty...AND the fact that she's a mere $24.99 is just icing on a cinnamon bun!!! (of which we bought a dozen before leaving the store-- oh shiot, yes!!!)

The rug is called Barbro Rand and it's 6'7"L x 2'x7"W...get more details here...I also love the fact that b/c she's a flat weave, I can customize her to fit whatever dimensions I need without all kinds of binding/fraying drama...genius!
So go on and get y'all some Ikea Barbro Rand action for an easy splash of summer style 'lisciousness...the yummy cinnamon buns are optional, of course!!!
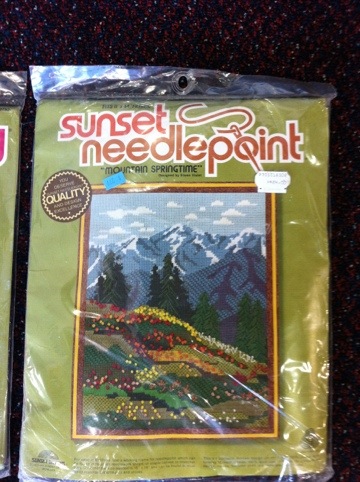
It's no secret that I'm slightly obsessed with vintage yarn art and embroidery...so, imagine my joy upon discovering these beauties while thrifting on vacation in Birmingham:
 This absolute score is actually three different vintage unopened embroidery kits that include the printed design on cotton mesh, wool yarn AND needles-- for $2.99 each! Ahhh, Salvation Army Family Store still knows how to slay us with some value, y'all...
There's "Mountain Springtime" (this gal would've cost $24.00 from JC Penney, according to the original price sticker still attached)
"Apple Time" (Her sticker says she was $15.99 at The Craft Showcase, but poor thing was reduced to $10.39 and still no one bought her! Damn!)

And of course, the serendipitous: "Lazy Days" (Oh shiot, The Craft Showcase was also selling her for just $14.99, but no one got off their lazy ass to buy back then-- I sure as hell did!)

I'm not certain how these gloriously heinous kits will become my latest works of art...wall hangings?...pillows? but trust, y'all, that something scrumptious will be served and stitched right into my collection!!!
Nov 9th was my last post? Oh shiot, I guess I’m overdue for a giant Alexis Colby Style Slap right about now…but hold that hand, y’all! For the past couple months I’ve started my own LLC, Alchemy Eclectic, gotten three new interior dec projects and have still been prop styling! In fact, as I type this, I’m in the middle of a two week gig in San Francisco for Pottery Barn Bed & Bath – so, shut the FU*@ YOU! Love y’all, Grandbaby Blog A Dazzlers!!! I’m excited to finally be able to share pics from a Brooklyn bedroom I designed almost two years ago…shot by the wonderfully talented Bob Martus.
 The room(s) already had this delicious architectural detail, but to make it a real feast, a two-toned paint treatment was added. Yummy!

Like most spaces in NYC, closets are virtually non-existent, so a potentially awkward nook was commandeered as a dressing room.

My client is a real dude, not necessarily a clothes-horse per se, but ANYONE can appreciate a room-turned-closet that’s tricked out with lots of stylish yet functional storage and a statement mirror! Your closets don’t have to be ugly, folks!


Overall, I think this space rocks! It’s just the right mix of modern and vintage...masculine and feminine…


I love that a questionable nook was turned out and became a swank dressing "den"! Hello Don Draper! I also j'adore the celebration of phenomenal architecture with that modern graphic paint treatment! So, hopefully I've given y'all a little somethin' somethin' to make up for my absence...rest assured, there's much more Dazzle goodness yet to come!

 The art you choose to display in your space says a lot about "who" you really are... it's not just a style statement... it can be a real journey into the psyche of the folks who live there... sometimes that's a trip you're eager to take-- especially when we're talking about yummy vintage yarn art-- holla-- or, it can be territory that's best left uncharted. Meaning, anything incorporating LED lights. And scene.
Thankfully, the good peeps over at art.com have trusted yours truly to offer up my picks for adding some pizazz to your place... I tried to corral a varied collection of art, without loosing my style stamp of approval. Currently they're featuring a gallery of floral and nature themed art that I selected. Check out my gallery here (just scroll down and click my face - y'all know you want to)... even if my suggestions don't backslap you, you're sure to find something that will help tell the world who you really are!
The art you choose to display in your space says a lot about "who" you really are... it's not just a style statement... it can be a real journey into the psyche of the folks who live there... sometimes that's a trip you're eager to take-- especially when we're talking about yummy vintage yarn art-- holla-- or, it can be territory that's best left uncharted. Meaning, anything incorporating LED lights. And scene.
Thankfully, the good peeps over at art.com have trusted yours truly to offer up my picks for adding some pizazz to your place... I tried to corral a varied collection of art, without loosing my style stamp of approval. Currently they're featuring a gallery of floral and nature themed art that I selected. Check out my gallery here (just scroll down and click my face - y'all know you want to)... even if my suggestions don't backslap you, you're sure to find something that will help tell the world who you really are!
 More often than not, I find myself mired in some sort of decorating dilemma or another. I'm looking for a certain THING for my apartment, a lamp, a coffee table, window treatments...whatever it is. I scour the market trying to find what I want, and a lot of times-- like a lover-- I find the perfect match! HOT! But, usually, the solution requires that I take matters into my own hands...oh ecstasy! And that's when things get all d.i.y. dirty up in Patrician Court, y'all!
Such was the case when I was looking for a hallway runner. I wanted something patterned, narrow and long. Most NYC apartment hallways aren't these grand wide spaces that can accomodate the standard 2'.5" x 7' runners that you see all over the market. Even if you go for it, at best, you're getting the look of a stubby wall to wall runner and we don't generally respond well to stubby here at Blog-A-Dazzle. No, no. Besides, our hallway has a kick ass mahogany inlay, why would I want to cover up an inlay, y'all?!
Shut the &$ck you, I wouldn't! And neither should you!
So, my runner had to be between 18"-22" wide and at least 8' long. We'd found a temporary fix that was as plain jane as they come, but at least it was narrow AND cheap.
More often than not, I find myself mired in some sort of decorating dilemma or another. I'm looking for a certain THING for my apartment, a lamp, a coffee table, window treatments...whatever it is. I scour the market trying to find what I want, and a lot of times-- like a lover-- I find the perfect match! HOT! But, usually, the solution requires that I take matters into my own hands...oh ecstasy! And that's when things get all d.i.y. dirty up in Patrician Court, y'all!
Such was the case when I was looking for a hallway runner. I wanted something patterned, narrow and long. Most NYC apartment hallways aren't these grand wide spaces that can accomodate the standard 2'.5" x 7' runners that you see all over the market. Even if you go for it, at best, you're getting the look of a stubby wall to wall runner and we don't generally respond well to stubby here at Blog-A-Dazzle. No, no. Besides, our hallway has a kick ass mahogany inlay, why would I want to cover up an inlay, y'all?!
Shut the &$ck you, I wouldn't! And neither should you!
So, my runner had to be between 18"-22" wide and at least 8' long. We'd found a temporary fix that was as plain jane as they come, but at least it was narrow AND cheap.

In the meantime I went hunting high and low for my perfect runner. And hunting. And hunting. Sweet summer skipped into azure autumn, leaves changed. Fall brought brisk nights, but no runner. Bummer. And then-- a random stop into West Elm changed my fate...forever. There, I found my runner...but not as I expected-- these things never are, folks-- it was a bath mat that seduced me!

Gorgeously patterned, soft and supple, 20" wide, $29 dollars!...and...what? Only 34" LONG?! Cruel, cruel fate! But don't cry for me, y'all...with some simple d.i.y. enhancements I spurned fate and now...for under $100 bucks, I have the runner of my dreams...and y'all can too. Here's how:
1. Purchase the quantity of mats that will equal the overall length you'll want when finished. I bought 3 to give me a little over 8'. Of note: be sure you confirm the widths of each of your bath mats by holding them up to one another before purchasing...I found there was some discrepancies with widths, though minor, even though it's the same bath mat. The widths must match up to look seamless. Lay them out on floor, end to end and then carefully remove the seams of the ends that are being joined, with a seam ripper.

2. Iron flat the loose ends of each bath mat that you removed seams from. Then, align them front to front.

You choose which sides you want to be your front. The pattern is on both sides of the mat, so see which two mats can match up as perfectly as possible...those should be your fronts. Note: the opposite end of your mat is already finished with a hem, so you can simply let that hem dictate which side is your front. Otherwise, you'll have to re-do that end hem as well if you switch it.

Pin the loose ends together, on the back side, being mindful to line up patterns. (I used T pins b/c the mats are somewhat thick and textured).
3. Carefully sew the two ends together. Be mindful to remove T pins as you sew. Go slow with this, y'all, the mats are textured and somewhat plush, so don't force your machine...she'll get angry and stop working!
 4. Once sewn, lay rug, front side down. Iron out the two sides of your new seam.

Then trim off excess material.

Iron one last time and flip over your new rug, y'all! Safety first: make sure you use a non-slip rug pad and enjoy...our dog Brandon sure is!


Y'all, believe it or not, Thanksgiving is just around the corner...and it's not too soon to begin your planning to avoid last-minute manic panic...might I recommend this amazing article in the November 2011 issue of Essence magazine? Yes, considering I styled AND am giving style tips in it, I just might! Get yourselves a copy & get ready for yummy, y'all:

Y’all don’t need me to tell you that NYC isn’t hurting for chic stores. That’s one of the best perks of my job is that I get paid to shop-- a lot. In doing so, I stumble upon some pretty amazing spots to get your style on. One of these is Modern Anthology.

Billing itself as “creative agency + retail lab”, this a double value discovery b/c in addition to the amazing store, they’re also a design firm. Genius style slap! Located in the Dumbo area of Brooklyn, this has to be one of the best stores I’ve seen in a long time. There wasn’t a single item that I wouldn’t be happy buying. From clothing & bedding to furniture & accessories, the sophisticated selection is extremely well edited, merchandised and just…well, cool. Think: hip big brother’s room that’s no longer off limits!


The “lab” just oozes masculinity, which explains why I was drawn in to begin with—heehee-- scandal! Vintage clothing, accessories & industrial furniture pieces are seamlessly mixed with awesome new offerings. This is the place y’all come when shopping for a gift for the guy who, “already has everything”. But make no mistake, thankfully, the owners of this place are total EOA--- Equal Opportunity Aesthetes--- giving guys AND gals the perfectly curated spot for some stylish retail therapy! Well played, my friends.

Y’all, I love using unexpected materials for projects…the other day while prepping for a shoot I was style-slapped when I came across these giant spools of baker’s twine at NY Cake!

Baker’s twine has such a cool, graphic quality about it. Love it paired with plain craft paper as ribbon for gift wrapping, like these two from Whisker Graphics that feature Air Mail twine, oh!


Or try using twine to tie ornaments on the tree. Thread some through small vintage ornaments and tie around the top of your glass jars from the recycling bin and you’ve got double the style value with some easy holiday vases! (forgive my holiday-centric ideas, but have already worked on three different holiday stories recently, so they’re fresh in my head) And take yourselves there by using colors other than the traditional red & white: charcoal grey (super chic!!!), orange, yellow, even turquoise—what?! These fun colors can work for any holidays or other festive occasions throughout the year.

The larger spools at NY Cake are just $17.99 for what appears to be like a million yards of twine & the smaller spools, $15.99. NY Cake also has a west coast location in L.A. (10665 W Pico Blvd), but y'all can also get your twine online from The Twinery (check out their fun blog too!) and Whisker Graphics Now go tie some on, y'all!
 Some of y'all may or may not remember, but a while ago (Dec 2009) I'd shared that our former apartment had been selected as one of the featured spaces in the new Design*Sponge book-- well, I'm thrilled to say that the wait is almost over! In fact, the book is available for pre-order on both Barnes & Noble and Amazon...check out this sneak peek below and order yourselves a copy:

It's a rare thing when I actually slow down enough from serving y'all all this dazzle to relax. And thats just what I'm doing today. We're at an awesome baby shower in Brooklyn, with amazing home-cooked food, cold beer and one of the BEST views in the world...THIS is summer in NYC and I LOVE this town!

 Y’all, June just seemed to jump right over me and somehow I’ve ended up in LATE July! I guess summer vacations have a way of doing that…but it’s never too late to be
STYLE-slapped! Oh YES! Which is exactly what went down when leafing through the new August 2011 Pottery Barn catalog! The ‘theme’ of this issue: Design Your Dream Home, where in addition to some great new product, they’re also now offering complimentary design services. I use the word “issue” deliberately here…PB has been blurring the lines of its’ catalogs for several years now. They don’t just sell product, they offer actual content-- style & entertaining tips, gorgeously photographed rooms that are beautifully styled, paint colors used in the rooms you see. And the website is even bigger, filled with actual videos on how to do everything under the Pottery Barn sun—and y’all know how we like ourselves some videos here at Blog-a-Dazzle?!
Y’all, June just seemed to jump right over me and somehow I’ve ended up in LATE July! I guess summer vacations have a way of doing that…but it’s never too late to be
STYLE-slapped! Oh YES! Which is exactly what went down when leafing through the new August 2011 Pottery Barn catalog! The ‘theme’ of this issue: Design Your Dream Home, where in addition to some great new product, they’re also now offering complimentary design services. I use the word “issue” deliberately here…PB has been blurring the lines of its’ catalogs for several years now. They don’t just sell product, they offer actual content-- style & entertaining tips, gorgeously photographed rooms that are beautifully styled, paint colors used in the rooms you see. And the website is even bigger, filled with actual videos on how to do everything under the Pottery Barn sun—and y’all know how we like ourselves some videos here at Blog-a-Dazzle?!
My PB love goes way back to when, fresh out of college, I had no money whatsoever to furnish my first apartment. I spent countless hours thumbing through the Pottery Barn catalog, studying it, trying to figure out how to achieve those looks with no money. The first sofa I “designed” was actually a horrendous “hand-me-down” from my sister, that I cut up and made a slipcover for, inspired by—y’all guessed it--- a sofa I’d seen in my Pottery Barn catalog.
Me and PB have come a long way, y’all…so much so that soon y’all will get to see some of MY styling in two upcoming Pottery Barn Bed and Bath catalogs—how’s THAT for a style slap? But in the meantime, feast your eyes upon this round-up of PJ’s picks of the latest Pottery Barn chic:
 {From left to right, Griffin Rope Chandelier, $399; Grand Hotel Clock, $129; Reinforced Burlap Baskets, $49-$69; Hawkins Tool Chest Accent Table, $399; Railroad Mantel Clock, $129; Wheelbarrow Salt Cellar with Wooden Spoon, $12.50; Oversized Wooden Frame Hangers, $24; Sheffield Cart, $1499; Galvanized Floor Storage, $129; Small Spaces Wallmount Hook, $89, please see I want that! page for more details and product links}


It was a mere four days ago that our kitchen cabinets were serving some heapin' helpins of 'oak' horrendousness, only to be transformed with a super-easy paint job! Our kitchen is lighter, brighter and feels brand new! And shut the &$ck y'all, this makeover only cost me $60 in supplies! Now, this is what I call yummy, y'all!
 Y'all, I'm well on my way to one sweet & sassy kitchen! The process has been smooth-sailing 'cause I'm totally in my 'paint place'-- that mindless, in-the-groove, itunes on, paintbrush-as-microphone place...we ARE a part of a Rhythm Nation, y'all! Sing it 'cause you want a better way of life-- through painted kitchen cabinets! And scene...
Y’all will notice I’m only painting the exterior doors and drawers. I wanted this process to be as easy and stress-free as possible. This may seem a little janky, but I don’t care how golden-y-oak the interiors are. For me, it’s all about the aesthetics on the outside…which, incidentally, also happens to be my philosophy about people. Oh shiot-- He didn’t? Oh, he DID y’all!
But, in all seriousness, painting your cabinets is probably the cheapest and easiest way to completely change the look of your kitchen, thereby giving you more drama than you can possibly ingest in one sitting. Just how dramatic you want to be is entirely up to you, but here’s how I’m getting my glam grove back into my cabinets:
1. Prep cabinets by giving them a light sanding and then a cleaning to remove dirt/dust. (Since I had thoroughly scoured my cabinets before—and in the process taken off most of the varnish, I didn’t need to sand them). Y'all can always opt out of sanding completely, b/c it's a total pain in the ass, but then you absolutely have to use the primer product detailed in step 3.
2. Remove cabinet doors and drawer faces. Then remove hinges...I opted to tackle one section, or “box” at a time, for space-saving & sanity purposes. (FYI, your cabinets are actually separate, box-like structures, some with doors, some with drawers & some with a combo of both)
3. Prime everything that you’ll eventually want painted with one coat of BIN Primer Ultimate Stain Blocker made by Zinsser. I have no clue what this stuff is made of and it will most likely be around long after any of us are, but it’s amazing! It completely covers any and all imperfections AND apparently eliminates having the need for any sanding whatsover! The can even says it covers “fire, smoke and water” damage, for those of y’all who have cabinets that have been REALLY rode hard. I used a 2” foam roller, following the grain of wood. Where necessary, I used smaller, craft foam “brushes” in hard to reach areas.

4. Once primer coat has thoroughly dried, it’s time for the paint. I used Benjamin Moore’s Ben Premium Semi-gloss Interior Latex Paint in White. Same situation with the foam brushes and going in the same direction of wood. Once paint is completely dry, carefully replace all hardware and just gently run your fingers over your freshly painted work, experiencing a 'tender caresses' decorating moment like you wouldn't believe. YOU did this! Savor and be satisfied!
 Y’all, one of the biggest projects off my apartment ‘Master List’ is painting our kitchen cabinets. Some poor soul, somewhere, thought golden oak cabinetry was just BEYOND glamorous. And then they went and punctuated it with bronzey-brass hinges! I just knew I was going to be greeted by a big ole shoulder pad when opening one of the cabinets for the first time! But instead of being served ‘Dynasty’, all I got was dead roaches and mouse droppings. And y’all know, that’s not the kind of drama I want coming out of my kitchen, oh no, shut the fu$% YOU! So, my first week in our place was spent scouring every inch of that kitchen beyond belief…yummy!
Fast forward to now: there’s been LOTS of drama in that kitchen and thankfully none that involve crawly-critters. I’ve begun to tackle the painting and it’s been going so well—I couldn’t be more pleased!


As y'all can see, I decided to go for a clean, simple and modern update by choosing white. There's also white in the "granite" countertop, so I knew I couldn't go wrong. I'm already backslapped by how great it looks and I'm not even halfway finished! The entire kitchen looks brighter and the cabinets look brand new. And y'all aren't even going to believe this, but I'm not even bothered by the brass hinges now b/c when paired with crisp white, their brass patina is chic! I said BRASS-SLAPPED! This is gettin' good, y'all...BUT WAIT, there's more! Be sure to check back-- I'll be sharing my progress as well as my step by step painting tips and tricks...tender decorating at it's finest!
 Math has never been a friend of mine…and I’m not sure why that is exactly. I’ve always dismissed our dynamic as "just not having enough in common". Math is so precise and exact. So right or wrong. There’s no wiggle room with Math. No drama or intrigue, no gray areas. I thrive in gray areas…I mean, what color doesn’t work with gray, right y’all?
For me, the same holds true for decorating—there is no real right or wrong. There’s an infinite amount of wiggle room, and nothing ever has to be exact or precise. So when I was approached to create a piece for Easy Decorating Magazine called 'Instant Room' that would illustrate basic elements (sofa, coffee table, light fixture & rug) added together to equal a specific style of room, I was a little skeptical. But I was quickly backslapped by Math... despite all her exactness (1 + 1 equals 2...blah, blah, blah) I discovered there’s a lot of wiggle room, you just have to be open to it. And just like decorating, being open to the unexpected can make for one hell of an equation. Look how these rooms add up:

Now go get properly schooled by grabbing yourselves a copy, out on newsstands now! Holla!
Y'all, get your Disa decorating fix with this latest video update...