Y'all, TRUST that this GORG dining room didn't just wake up like this...
Read MoreGuess Who's Coming to Dinner?
Y'all, TRUST that this GORG dining room didn't just wake up like this...
Read MoreY’all, there’s been a lot of glamour going on in my world recently, so please forgive my lapse in posts. The biggest is that we’ve moved into a new apartment, which y’all will be learning a lot more about right here... holla, new decorating hijinks!!! The other is the completion of our first episode in a new web-series I’ve developed called, Style Rehab. If the title doesn’t convey it enough, it’s a show about stylish ways to rehab, or rehabilitate, one’s space. Our first episode features Andrea, who’s in dire need of some craft corner style love. Watch and enjoy and of course, I welcome your comments! And if any of y’all are in need of a serious intervention, Style Rehab is taking on new patients! Send me an email of your ailments, we’ll get you good and fixed-up!
Y’all, choosing the right window treatments for your space can be overwhelming, to say the least. There are tons of options. I like to let the existing architecture of the window trim help guide my choice for a solution. If it’s serving me drama, I go with a treatment that won’t compete with that, but will still have some razzamatazz for the room. That’s usually simple muslin, or canvas curtain panels that puddle a little on the floor. I add a little somethin’-somethin’ with grommets, bead chain, and re-purposed pipe and flange as the curtain rods. But not always:

These are my living room curtains, which I made from muslin and then trimmed in twill tape! They’re hung from inexpensive heavy duty tension rods which are excellent when you’re renting and don’t want to make tons of holes in your window frames. I love how I’ve got functional curtains to filter light, but I still get to see the delicious trim of the windows. Yummy, y’all!
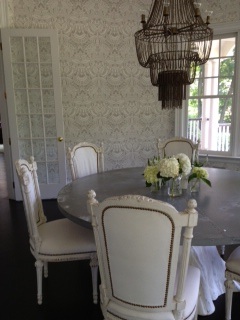
 It’s a similar situation in Disa’s dining room. She’s got a giant window space (it’s actually three separate windows) surrounded by pretty wood trim. She’s had these white plantation shutters already installed on the bottom half, (LOVE!) but needs a solution for the top half.
Like most folks, she wants privacy, but also still wants some natural light. There are quite a few solutions for this scenario, but we’re going with a relaxed roman shade. I love roman shades, especially the relaxed style. See an example here y'all. They’re functional, straightforward, and unfussy. They also help add softness and are a great way to inject color and pattern into a space. Plus, if mounted inside the window frame, they perform while still sharing the spotlight with architectural details like our wood trim.
Y’all can purchase ready-made roman shades (at Target.com, JC Penney, Overstock.com) but I strongly recommend going custom. Remember y’all: Custom-ness is next to Godliness! Sure, it’s pricier, but worth the investment b/c your windows are the eyes to your spaces’ soul. For those of you fortunate enough to live near Calico Corners, like Disa, take yourself there immediately! Don’t fret if you don’t-- They have a full-service website, just waiting to take y’all there! These peeps do all things fabric: upholstery projects, window treatments, gorgeous fabrics by the yard. They’re knowledgeable, friendly- holla to Lynn- and sure know how to serve some hot music hits for increased shopping excitement! In fact, watch my complete conniption with Disa in Calico Corners for yourselves:
Oh, y’all that did feel good! Even better, we got a major feature of Disa’s dining room taken care of and I got my dance on! Decorating is FUN again!
Photo Credit for Living Room Drapes image: Hector Sanchez
Y’all know sometimes you just can’t control exactly when or where you’ll want to bust a move…like at your local Home Depot, where on another makeover visit with Disa in Maplewood NJ, she tore up the plumbing aisle with some dancing glory! Check it:
I have no idea why I’m whispering in that bit, but it sure does add some drama!
And y’all aren’t going to believe the amazing industrial glassfront cabinet we scored at this wonderful architectural/found object shop called, 2 Guys From Newstead! This place wasn’t even open when we first pulled up, but after witnessing my total freakfest through the windows, complete with shrieks and lots of arm flailing, they opened right up! That’s what I call effective window shopping, y’all!! That cabinet is going to be amazing for china storage in Disa’s dining room! I love to mix in unexpected, re-purposed pieces like this into spaces. Y’all don’t have to limit yourselves when choosing furniture. Think about how you need the piece to function for you in your space, and then think of all the other options that are out there to serve that function in terms of furniture. Look at magazines and tear out pages for inspiration.
For Disa, I needed a china storage solution but I also wanted an industrial/metal element in the space. Instead of just jumping right onto the typical china hutch train, I thought about different storage pieces that could be re-purposed to hold china…and look hot in the process. Thus, a metal bookcase with glass- a feature that still speaks to actual china hutch origins- came to mind. The next obvious part of all this, as y’all have no doubt figured out, is finding these pieces. But that’s the best part, where all the shenanigans can be had- like getting your groove on in a Home Depot! Y'all can have tons of fun (and often SAVE big) by scouring unexpected places if you keep an open mind: junk shops like the one above, craigslist, ebay, thrift stores, flea markets and yard sales. Added bonus: when buying vintage or gently used furniture you're adding a layer of authenticity to your space that could be lacking if everything is store bought and brand new. Also, re-purposing gives you the flexibility to customize a piece to perfectly suit your needs. And custom-ness is next to Godliness, y'all! D.I.Y. yourselves!
So, Disa and I tore up some aisles on our first, but certainly not last, shopping excursion in the quest of fulfilling her dreams by way of her house re-design. And be sure to re-watch the video above...yes, I do look that good on camera as well as off, y'all, yet I'm also sharing a clever curtain rod treatment that will send you dancing to your nearest plumbing-parts store! uh-huh, I've just written rod and plumbing in the same sentence! Design Scandal! Now go get to shopping!
Y’all, it's been a while, but I'm back! If you hadn’t guessed it already, designing a House of Destiny is no easy task—especially when you’re working with someone as glam as Disa. Afterall, this is the lady who’s been known to rock a gold lamé headband AND take color inspiration for her house from an 80’s prom dress! Damn! But don’t be fooled, y’all, my years spent in shoulder pads and ‘Cruel Summer’ pastel bandannas helped make me the style friend I am today! Thus, with feathered hair, I give you my sketches for Disa’s Dining Room:
 Aside from wanting a kick-ass place to entertain, her specific wishlist for the room was this:
The overall vibe I’m going for is feminine- rustic meets industrial. Disa established the rustic because she’d already bought the dining table and chairs. To contrast all the yummy wood going on, I’m going to weave in hits of feminine glitz- a crystal chandelier, mercury glass candlesticks, luxurious fabric used to create a window treatment , a gorgeous rug ! I’ll bring in the industrial with metal pieces such as a china cabinet, window treatment hardware, and galvanized accent architectural pieces. We’ll lose the dark wood buffet. Here’s what I’m proposing:

There’s also an awkward nook beside the fireplace, so I suggested a built-in cabinet that could double as a bar…now, that nook becomes an attractive solution and a real feature in the space, here’s the sketch showing that:

On the wall leading into the living room, I’ve proposed a gallery style treatment for family photos and artwork, complete with cute lighting and a sweet bench that can double as additional seating for one of Disa’s rage-a-thons!:

As with most design projects, there will be adjustments, fits of rage, Dynasty-like slaps, tears…maybe even some bloodshed…but that’s what makes it FUN, folks! This is home decorating, y’all! So, I’m off to start turning it out…In the meantime, enjoy some highlights from my last visit with Disa where I shared these sketches with her:
Y’all, inspiration for redoing your space can come from anywhere…like an incredible Lisa Lisa & Cult Jam song, or even a bad-ass bridesmaid dress! Meet glam girl Debbie, or as I call her, Disarrono, or even more elegantly, just Disa (as her purple bridesmaid dress with matching headband would suggest- pure ‘Dynasty’ drama! I love it!) Disa and her adorable family (husband of hotness Brian and love bug son Will) need some help with their new home in the quaint town of Maplewood, NJ. Holla, new project for PJ!

I’m doing four rooms: dining room, den, office and entryway. It’s a bit of an undertaking, but it’s really exciting b/c their home is so charming. I love them and want to help them fulfill their house destiny!!! Also, y’all, these are the architectural details of dreams…moldings, hardwood floors, glass insert doors, a yard…just an overall fabulosity that’s only a 35-minute train ride from NYC. Check out these before shots:


It should come as no shock after watching our hot music video above that Disa wants to work in a purple and silver color palatte for the dining room. The other rooms will get some fun complimentary colors that I’ll present to her.  She picked out Benjamin Moore’s Raspberry Ice #2072-70 on the fan deck as the starting color, which as y’all can see here ends with Dark Basalt #2072-10. I think it’s a pretty & sophisticated group of purple to work within…we get some hits of the color in the bridesmaid dress that fulfills her dreams, but the range of purples also opens up more possibilities to work in multiple shades.
I think having more shades of one color in a room gives a room layers and depth…it’s also great b/c you have more options when shopping for objects that go into the room. Plus, I know a lot of y’all freak out when it comes to color and how to decorate with it. Avoid color trauma and a lot of costly purchase mistakes by just shopping with your paint chips. Most paint companies print their paint colors in color ranges on one chip, like the one pictured here. And if they don’t print multiple color ranges on one chip, they usually group them by color range when displayed…take your color choice and then two or three before and after your color choice. Now you’ve just taken yourself there with a color range! Holla! Y’all can also check out www.benjaminmoore.com for terrific tips and tricks when it comes to not only painting, but other overall color goodness as well.
So, let the House of Disa’s Dynasty begin! Expect to be updated regularly with lots of fun pics, video and drama details of the journey to transforming this amazing space.
Oh and lest you think I didn’t really love y'all, my dear readers, here’s a bonus video of Debbie before she was Disa… enjoy!
WOW... I have a crush on HER! Take us there Disa!
 One of the best dumpster dives I ever had was when I still lived on Status Island, NY (a.k.a. Staten Island)…yes, y’all, I called the oft-forgot borough home for three years! And what a sweet home it was… top floor a an old grain warehouse, at least 3500 sq feet of space... and my bedroom, which doubled as my rehearsal space was complete with ballet bars and a wall of mirrors! Strictly for rehearsals, ahem, of course! Oh shiot! Me and my creative partner, Alane, dubbed the place Chateau Monroe. She's still rockin' it there, click here for a peek at the fabulous pics she's taken of the Chateau!

Chateau is directly across the street from an elementary school, which provided more street side bounty than y'all can shake a stick at! One dive unearthed the locker pictured here. In perfect condition, aside from the random sticker & used stick of deodorant, this was a major score! Lockers (or any metal cabinets for that matter) always get me at “hello” for their industrial hotness and versatility as storage workhorses. The repurposing possibilities are endless! So, hello to my new DVD cabinet! This find was also extraordinary b/c almost a year earlier, Alane and I had found an identical locker at the same school! Now I had double locker love, y’all! Who doesn’t adore a twin?!
After a thorough scrub out I stripped the green paint using paint remover. Now, this is labor intensive beyond belief, y’all, but I love the look of unfinished steel and I’d already done the same treatment to the matching locker. Follow the included instructions on your paint remover can. You can also make the process as fast as possible with some power tool help. I used an electric sander and a sander drill attachment. Note: when using any kind of sand paper, you’ll get scratch marks in the steel or whatever metal you’re uncovering. But, to keep the marks at a minimum, remember that the finer the grade of sandpaper, the smaller the marks. Also, stripping the paint in the same direction and with the same amount of pressure to the power tool will keep the marks consistent and much less noticeable. If y’all are totally OCD and just can’t stand marks, then there’s always scraping the whole piece with a hand scraper. But y’all will definitely need to have some alcohol on hand for that process! Stripping paint is no joke, so to save the remainder of my sanity, I just kept the institutional green finish on the inside of the locker. No one cares what's going on inside when the outside looks so damn good, as witnessed in the glam opening shot!

Once stripped, I sealed the locker with Butcher’s Bowling Alley Wax. This amazing product seals the piece to prevent oxidization, or rust. It also leaves a really nice matte finish. If you don’t want to use wax, you can also use a polyurethane, but y’all can’t skip this step or you’ll RUSTgret it! Get it?! Oh genius!
Finally, I measured and prepped the locker for wood shelving, (which I had cut at Lowe’s). This involved drilling what seemed to be about 500 holes into both sides of the locker. These holes would accommodate the L brackets that would support my wood shelves. Make sure y’all measure twice on this part, b/c once you’ve drilled into metal, you can’t really patch it! Five shelves later, I’ve got industrial storage chic-ness that houses a massive movie collection, with growing room too!
Y'all, won't you fulfill my destiny by sharing some of your repurposed furniture goodness with me? Send an email to blog@pjmehaffey.com and I'll share in a future post. Take us there!
 As some of y’all have experienced firsthand, dogs aren’t content to chew on just dog toys alone…they often need more. Sounds like some humans I know, but that’s another post altogether! In this instance, my friend's dog decided her Eames DCM, or Dining Chair Modern –gasp- would make a tasty treat! Uh huh! But, don’t be a sad panda, this tragedy was turned into a triumph b/c she gave me the chair! Talk about a tasty treat, y’all, damn! This was a modern classic score!


I knew that those chew marks and holes could be easily remedied with some wood putty and light sanding. The rusted chrome legs could be shiny again, thanks to some love from my BFF, Brasso. What gave me the most concern were the two missing gliders on the end of the chair legs. I’d seen replacement gliders sold at various hardware stores, but wasn’t sure they would be the right size for this classic chair. Sure enough, they weren’t. But with some internet digging, I found them at IEC, International Equipment Components, Inc. They don’t normally sell gliders in small quantities, but the sweet salesgirl could hear the panic in my voice, and sold four with a sample fee of $10.

** Did y’all know? The proper size glider is found by figuring out the diameter of the glider post or the hole on the underside of chair leg. To do this, I took the glider I did have to the hardware store to get the exact measurement off of screw size chart. It was 8-32. Who knew?!**
The only other hiccup in the transformation of this chew toy chair was with the wood putty. Wood putty is kinda like play doh, minus the primary colors and intriguing salt-like smell (& taste)! Y’all know you ate your play doh! It’s pliable and spreads easily to fill holes, nicks, etc. in wood. It’s available tinted, the idea being it will match whatever you’re repairing, but it’s also paintable and stainable if need be. Since my chair had some pretty gnarly holes, I knew that no matter how exact a match the putty was, I’d probably need to stain the chair a much darker color, to totally hide the patch job. So, about 25 coats of Minwax Ebony stain later, I came out on the other side with a fabulous chair and not a chew mark in sight! Check it out!


 Y’all, it’s official, my style destiny has been fulfilled! Our apartment is going to be featured in the upcoming design*sponge book!!! I love design*sponge blog, so it was a complete thrill to learn our apartment had been chosen for inclusion in their first book on stylish spaces.

The amazingly talented Hector Sanchez shot our apartment back in October…it was a whirlwind photo shoot, but a labor of love since it so beautifully captures all of the hard work Dylan and I have put into our space over the past three years. Can’t wait to see the book in Fall 2010!
I love having lots of artwork on my walls. I think it’s a relatively easy way to inject all kinds of style and drama-glam into one’s space. But y’all watch out, ‘cause what you choose to hang on your walls, says a lot about who you really are! It’s kind of like a window display into your soul! So keep that in mind when you’re debating about where to hang that velvet Elvis painting, holla! I certainly have no problems letting my soul glow by way of my artwork display, but where I get snagged is having things framed! Custom framing ain’t cheap, y’all! Since my artwork usually comes from trolling thrift stores and flea markets (in other words, it's cheap), I don’t necessarily want to spend a lot of money on having it framed. It’s also a time issue… it can take several days to have something framed (that’s if I remember to haul it to the frame shop) and like most folks, I just want that project done yesterday!

Well, wait y’all, there's more: Store bought frames and mats! For my funky little paint by numbers desertscape, which I scored for a mere .35 cent at a Goodwill store (Goodwillla Goodness!), I bought this frame from West Elm, on special for $30 (take us there, West Elm value!). I love how clean and modern the all-white frame and mat will look against the chaos of colors this little painting is serving us! There are tons of places that sell similar frames with pre-cut mats, here a few that I like: Pottery Barn, CB2, Zgallerie.
My painting was slightly larger than the 8 x 10 opening in the pre-cut mat, so I just took it to my local frame shop to have it cut to fit! For a mere $3, Darrin at Prints Charming (yes, y’all that’s the real name, I can’t make this genius up, call him: 718-230-8118) explained that he could trim the mat to fit my painting while I waited! Now that’s called service!
BUT- sad panda spoiler alert- there was a slight problem! He discovered that the pre-cut 8 x 10 opening was intended for vertical display only b/c the mat was smaller on top and bigger on the bottom, meaning it would be off-center horizontally. Oh, y’all, who knew framing could sound so raunchy?! There would be no way we could properly frame my desertscape horizontally by using this pre-cut mat! What, horrors! I didn’t even notice this when I bought the frame! BUT, tragedy turned triumph when for only $16, he cut a brand new mat and it looks amazing! Check it!

So, even though I’d have much rather paid $3 to have Darrin trim the store bought mat, the $16 I did spend, added to the cost of the frame, still brought me way under what Darrin said would have been a $108 custom frame job! I think that’s awesome! Plus, there’s added value here for y’all learning from my oversight…be sure to double check the store bought frame & mat against the orientation of the artwork you intend to place in it. Y’all know how controversial orientation can be!
New York City is pretty amazing in a lot of ways, but a stand-out for me, is the TRASH. Uh-huh, that’s right. Any given sidewalk can be a treasure trove of all kinds of things- furniture, art, lighting...if you can think of it, it’s probably been found on a sidewalk here. (Now don't go there... you dirty boys and girls!) It makes sense too, b/c the sidewalk is where our trash collection happens. But it’s also just easy for most folks who are getting rid of unwanted items to put them out on the sidewalk. Once you’ve struggled down five flights of stairs with a dresser on your back, you’re pretty much done with the thing at that point. And that’s when someone else’s backache becomes my sidewalk salvation, y’all! And trust that I’m not alone in this revelry. Discovering some completely unexpected find is not only exciting, but outright joyful for a lot of people like me.


So it was the other morning when I was out walking our newest family member, Brandon! Adopted from the ASPCA, he's a little over a year old and a total love. He's been with us now for about a month and we adore him! Just look at those dancing skills... Having to walk a dog at the most insane hours takes some getting used to, but on the plus side, it's another amazing opportunity for some incredible sidewalk shopping, let me tell y'all! And this lamp I found the other day is no exception. Now, I guess some people would be deterred by the missing shade, or harp (that bit that holds the shade up from the bulb), or just can’t be bothered with lighting b/c you never know if it works until you get it home. But, with all my years of experience and expertise with all things trashy (remember I grew up in Goose Creek, SC), these are just minor inconveniences. Besides, part of the joy involved in finding treasure, for me, is the rehabilitation and reinvention process. A great sidewalk score is wonderful, but bringing it back to life with your own unique flourishes is what gets me going. Sure, it can pricey, laborious, sometimes even toxic (if we’re talking about stripping paint or some such) but y’all gotta give to get glamour! Lookin’ good is hard work, Damn!
Once I’d tested that the lamp worked by saying a prayer and then plugging it in (hooray, it did), I gave it a good cleaning. I just used a damp rag with diluted Murphy’s Oil Soap, since the neck and base of the lamp are wood. When it was dry, I applied Linseed Oil to the wooden bits. Linseed oil is a terrific conditioner for all types of wood. You can find it at hardware stores. I often use it in lieu of having to refinish an entire piece.
I got a new harp and shade for the lamp at Just Shades. They have an almost dizzying array of shades, but their staff is friendly, knowledgeable and patient. Bless staffer Bonnie Engelson’s heart, who graciously helped me during the two visits I made in order to get exactly what I wanted.
Lampshade breakdown, y’all: like the perfect accessory to an outfit, the right shade can take your lamp to a "whole 'notha level"! They come in all kinds of shapes and sizes as well as various materials, like silk, linen or parchment. They’re available ready made or can be custom, for all those out there where money is no object. Prices can be just as varied as the styles available. Home decorating magazines or catalogs are great sources to find shades and lamp styles that you like. I prefer paper drum shades. I find that by using the same type of shade on all the different styles of lamps in my space, it ties them all together for a more cohesive look. But, again, like accessories to your outfit, pick a style, or silhouette that you like (some of us like bow ties, ahem) or that you feel is the strongest pairing for the individual lamp. There are some other factors, aside from the silhouette, to consider, such as the size/scale of the shade and the intended function of your lamp. Is this a reading lamp or just a glam drama light moment in your space? All these things need to be considered when choosing the shade. I encourage y’all to spend some time on the Just Shades website where you can find out more detailed info like how to measure a shade, take a peek at different silhouettes, materials, etc.

Alright onto the reveal! Ohhhh, ahhhhh! I’m thrilled with the way it turned out and even more excited by the fact that with a little $$ and some elbow grease, I now have a stylish one of a kind lamp (and dog) to illuminate my life beyond belief...
Do y'all have any street finds that you'd want to share? Send them to me and I'll post them: blog@pjmehaffey.com
kay, so it's OFFICIAL...welcome to my new and improved blog, brought to y'all by my friends at Wordpress (& my IT Director, Dylan)... Now, not only will you be able to leave comments, but you'll also be able to use the awesome search function to find all kinds of things to help you fulfill your destiny! Exciting! New! Hilarities!
Read MoreHey y'all, Let the crafting (& blogging) begin! With the launch of the new Holiday Decorating Webisodes on RealSimple.com, I feel that now is as good a time as any to start my blog. I've been wanting to fulfill my destiny by way of a blog for quite some time, but I just never felt that I had anything that was earth shattering enough to share. And being a performer at heart, EVERTYHING I do MUST...be...earth shattering (cue fog machine)! But, I’ve come to understand through much encouragement from friends (some who blog, others who wish they did), that blogs don’t have to be, and often aren’t, earth shattering and sadly, often NEVER involve fog! They can be whatever you want them to be. So, above anything, I want mine to be purposeful to those who read it… I want you to be inspired, informed, maybe a little jarred, and most of all ENTERTAINED…
Read More